Workflow
Workflow is completely customizable for each broker. LoanCatcher℠ offers a drag & drop editor allowing each broker to update their workflow tasks or create an entirely new custom workflow plan that suits their business.
During the LoanCatcher℠ on-boarding process, an entity selects the Workflow template to use. However, this can be changed by any user assigned a Workflow Manager role by the system administrator.
Review the Workflow Introduction and other related Workflow videos in the Resources & Videos section for additional information.
Select Workflow from the left-hand quick navigation menu. This can be done from the Pipeline view or within a specific loan.
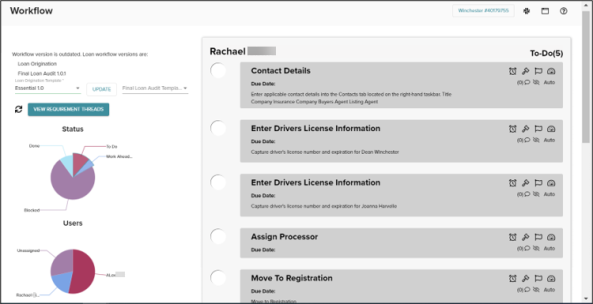
Workflow is an evolving task list providing the current state of each file, including completed and uncompleted tasks.
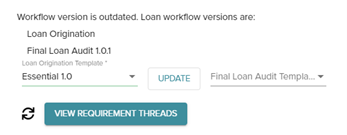
The Workflow section is only visible to users with Workflow Administrator permissions. It shows the active workflow template and allows updates to the workflow template.
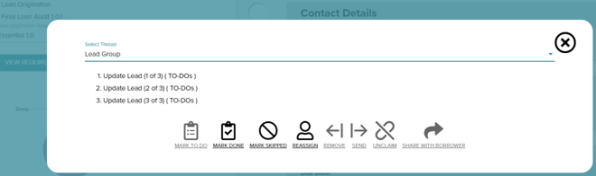
Select VIEW REQUIREMENT THREADS to view and manage all the requirements that are linked in a single group. Currently, there are 3 groups - Lead, Title, Appraisal.
Pie charts show a breakdown of all requirements by Status and User. Additionally, the pie charts function as filters. Select a slice or multiple slices to filter the results . Hovering over a slice to see the total number in that category.
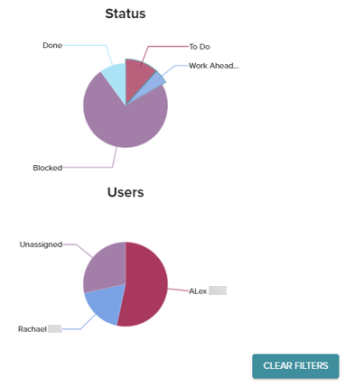
The right side requirement list updates simultaneously with the pie chart selections.
The CLEAR FILTERS button removes all filters so that all requirements are listed on the Workflow page.
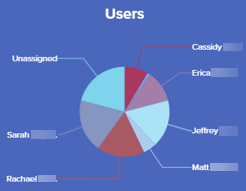
Users Pie Chart
The Users pie chart itemizes tasks by the assigned person and includes an unassigned category. Workflow tasks designated as unassigned can be claimed by or assigned to any person with a loan specific role.
Status Pie Chart
The following are descriptions for each status represented in the Status pie chart:
-
To Do: Requirements that remains open, needing to be addressed/complete.
-
Work Ahead: Requirements that trigger at a future time based on the assigned template flow or manually set date.
-
Blocked: Requirements that are blocked from becoming active until after another specific related task is completed.
-
Done: Requirement that have been fully completed.
-
Skipped: Requirements that have been skipped.
The right side of the Workflow page displays requirements that meet the filter criteria selected in the pie charts.
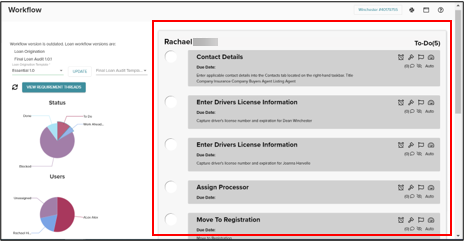
This section includes the user and status category accompanied by a total count.
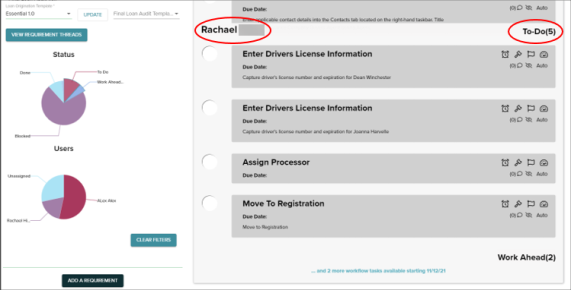
Select the link under the Work Ahead category to expand the results.

Example of expanded category:
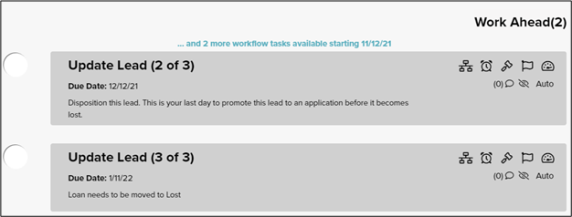
Select the link again to minimize the list.
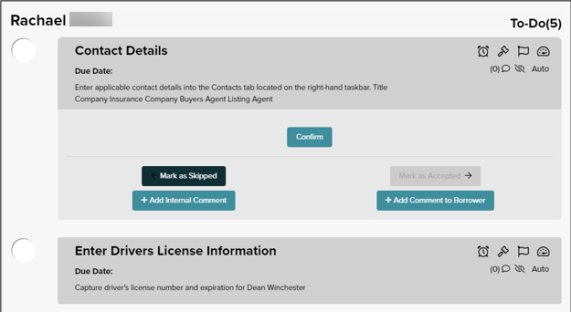
Select in the grey area of a requirement to expand the task, allowing you to review it and take action.
There are 6 types of requirements:
-
Automation: Triggers an automation when this task is available. For example, skip lead flow if file is moved to Registration status.
-
Checkpoint: Ties to a checkpoint on the Loan Center. For example, upload the signed initial Closing Disclosure.
-
Confirmation: Displays a Confirm button. Click Confirm when the task is complete to mark the task as Done. For example, enter applicable contact details into the Contacts.
-
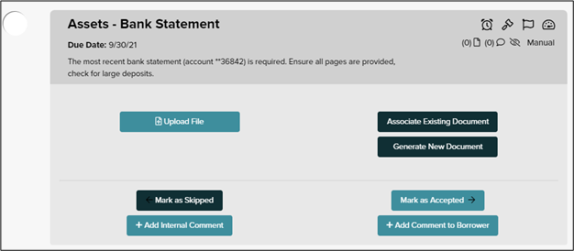
File Upload: Requires a document to be uploaded. For example, save a copy of the Flood Certificate in the Documents page.
-
Free Text: Allows a written response. For example, provide an explanation regarding employment gap between February – April, 2020.
-
Custom Work Component: Custom pre-built forms. For example, enter the Driver’s License number and expiration date.
Requirements are triggered by the assigned template. You can also manually add requirements.
To add a requirement on the Workflow page, underneath the pie chart filters select the ADD A REQUIREMENT button.
Input the required data. When ready, click ADD to officially add the requirement to the loan workflow as a task. To cancel adding the requirement, click Cancel.
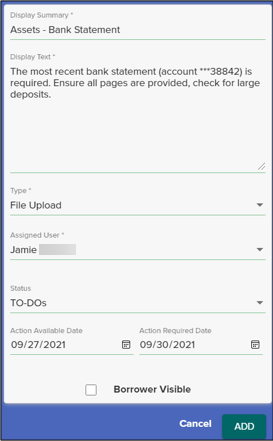
Action Available Date is the date the requirement reflects as a To-Do category task. Until the assigned date, the task is under the Work Ahead category.
Action Required Date is the requirement due date. A Past Due message displays after this date has passed.
If the Borrower Visible box is checked, then the requirement will be visible to the Borrower on their dashboard.
Example of newly added requirement:
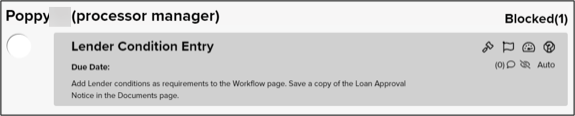
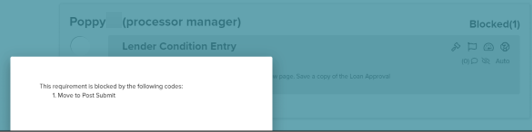
Blocked requirements are prevented from moving to the To Do category. Click the
![]() icon to view information about why a requirement is blocked.
icon to view information about why a requirement is blocked.
A dialog displays at the bottom of the screen indicating the task that is blocking the requirement.
Each requirement displays several icons providing additional information about the requirement.

 Snooze Task
Click the Snooze Task icon to change the requirement available date and due date.
![]() Compliance
Compliance
Indicates a Compliance matter.
![]() Manager Review
Manager Review
Indicates that a Manager should review the requirement/situation.
![]() Urgent
Urgent
Indicates a situation requiring immediate action or attention.
![]() Uploaded Files
Uploaded Files
Indicates the number of documents uploaded to the requirement.
![]() Comments
Comments
Indicates the number of comments added to the requirement.
![]() or
or
![]() Borrower Visible
Borrower Visible
Indicates whether the borrower(s) can see the requirement on their dashboard or not. An eye with a slash indicates it is not visible to the borrower.
![]() or
or
![]() Task Creation
Task Creation
Indicates how the requirement was created, either automatically through the workflow template or manually.
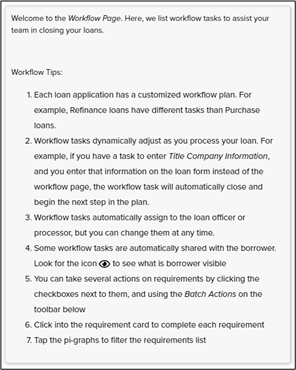
A workflow tip section is located on the lower left side of the Workflow page.
Workflows integrate with the Loan Orders page in LoanCatcher℠. Any relevant workflow tasks are created automatically when a loan order is added.

Click on a workflow task to address it while working on the Loan Orders page.
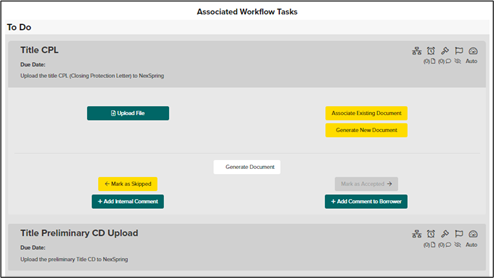
Full workflow functionality is available in this view, including:
-
Upload File
-
Generate Document
-
Mark as Skipped
-
Add Internal Comment
-
Associate Existing Document
-
Generate New Document
-
Mark as Accepted
-
Add Comment to Borrower
Additionally, the broker has the ability to enable or disable workflow email reminders using the Enable Recurring Emails toggle on the Borrower Recurring Email setting Screen.
